Mining Help
How to connect AvalonMiner ASIC to NiceHash?
Follow the steps below to connect your ASIC to NiceHash.
Step 1 - Connect and power on
Plug in the internet and power cables and turn on the ASIC.
Step 2 - Locate the ASIC IP
Find the ASICs IP on your local network. This can be done by connecting to your router, navigating to DHCP, and looking up the ASIC IP or by using dedicated tools like NiceHashTools.
Detailed instructions can be found here.
Copy/paste the IP address in your browser.
Step 3 - Log in to the ASIC dashboard
Log in to the ASIC dashboard by entering the username and password.
The default username and password is ‘root’.
Step 4 - Open the Configuration tab
Navigate to the Configuration tab.

Step 5 - Find the algorithm stratum address
NiceHash supports over 30 different mining algorithms, including SHA256, Scrypt, Equihash, and others. You can find the list of all algorithms here.
To find a suitable stratum address for your ASIC miner, please use our stratum generator:
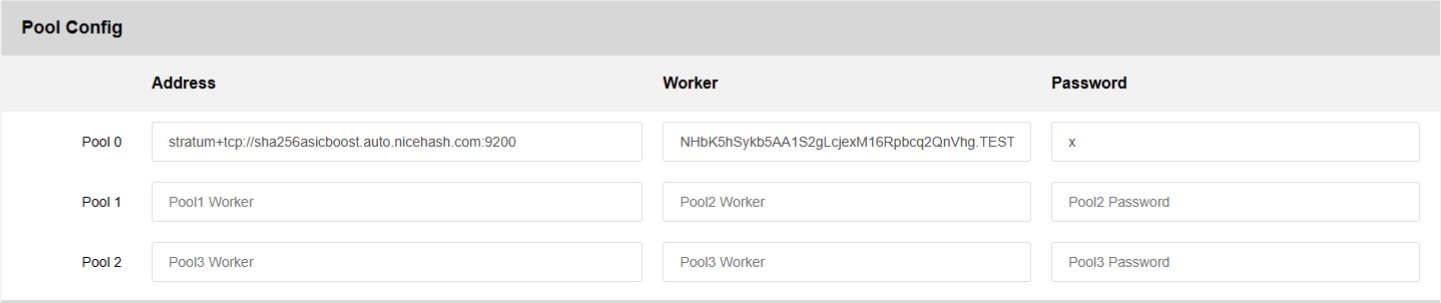
Step 6 - Enter the stratum, mining address, and password
Copy the stratum server configuration (step 5).
In this case, we will use the BTC market stratum+tcp://sha256asicboost.auto.nicehash.com:9200 or stratum+ssl://sha256asicboost.auto.nicehash.com:443 (if SSL is supported).
For the USDT market, use stratum+tcp://sha256asicboost-usdt.auto.nicehash.com:9200.
Paste it in the Configuration tab (step 4) inside the Pool Config Address text-field
Note: In case of connectivity issues or rejected shares, try using #xnsub. It should be used at the end of the stratum line in the Mining Address URL text-field (stratum+tcp://scrypt.auto.nicehash.com:9200#xnsub). You can learn more about #xnsub here.
Use your Nicehash Mining Address for the Worker text field.
You can use it like this: MiningAddress.WorkerName to name your worker.
The password should always be ‘x’ or '123'.
Step 7 - Save
Click Save.
Note: some ASICs need a restart for the changes to take effect.