What is NiceHash OS v2?
NiceHash OS or NHOS is a Linux-based operating system for cryptocurrency mining built by NiceHash. NHOS v2 is a brand new version of our operating system based on Ubuntu.
NHOS v2 Features:
- CPU Mining
- GPU (NVIDIA & AMD) Mining
- Mining Most popular mining algorithms supported by NiceHash
- Remote Overclocking
- Remote Monitoring
- Automatic Profit Switching
- Automatic Overclock Switching (Bundles & Profiles)
How to set up NHOS v2?
NHOS v2 Requirements:
- 8GB USB drive or larger
- A PC, Mac or Linux system with the NiceHash Flash Tool installed
- A mining system with at least 4GB of RAM, 8GB is recommended
- A mining system with compatible hardware
Flashing the NHOS image on the USB drive
To use NHOS, you need to flash an image of NHOS on your USB drive. To do this watch our video here or follow the steps below.
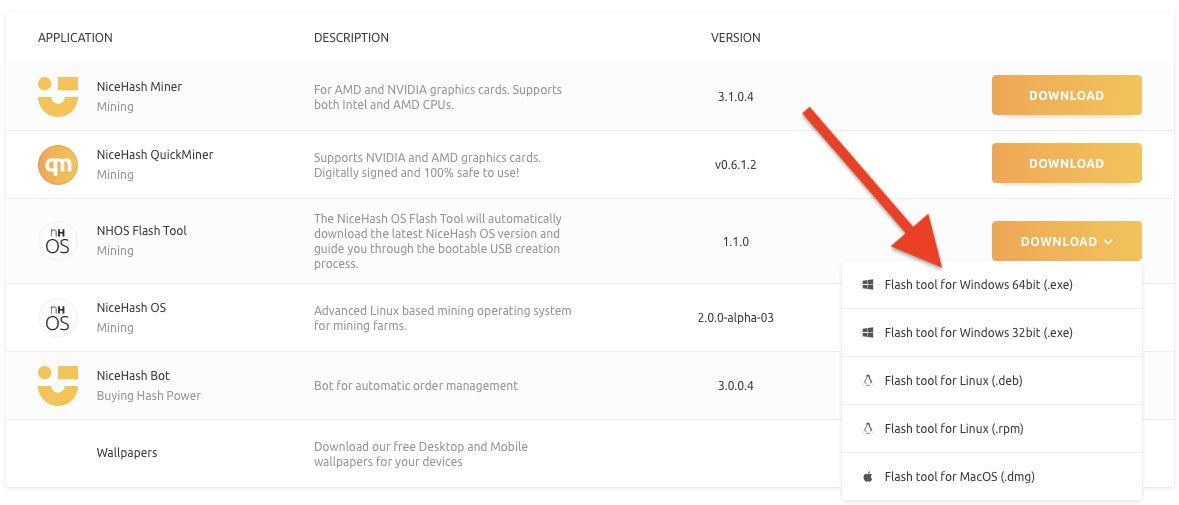
Step 1: Download the NHOS Flash Tool
You can download the NHOS Flash Tool here. Make sure to download the version that matches the operating system you will be performing the flash on.
Step 2: Install and run the NHOS Flash Tool
You will need elevated privileges on your system (administrator privileges on Windows and root privileges on macOS or Linux).
Step 3: Enter your Mining Address
In order to successfully flash the USB key you must enter your NiceHash Mining address or your External BTC wallet. You can manually copy and paste it into the Mining Address field or click on the FETCH ADDRESS button and the Flash Tool will automatically get the address from your browser. Note that you must be logged into your NiceHash account.
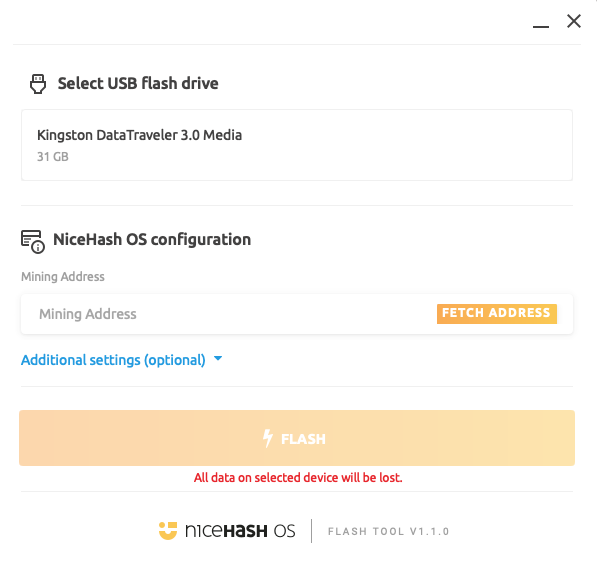
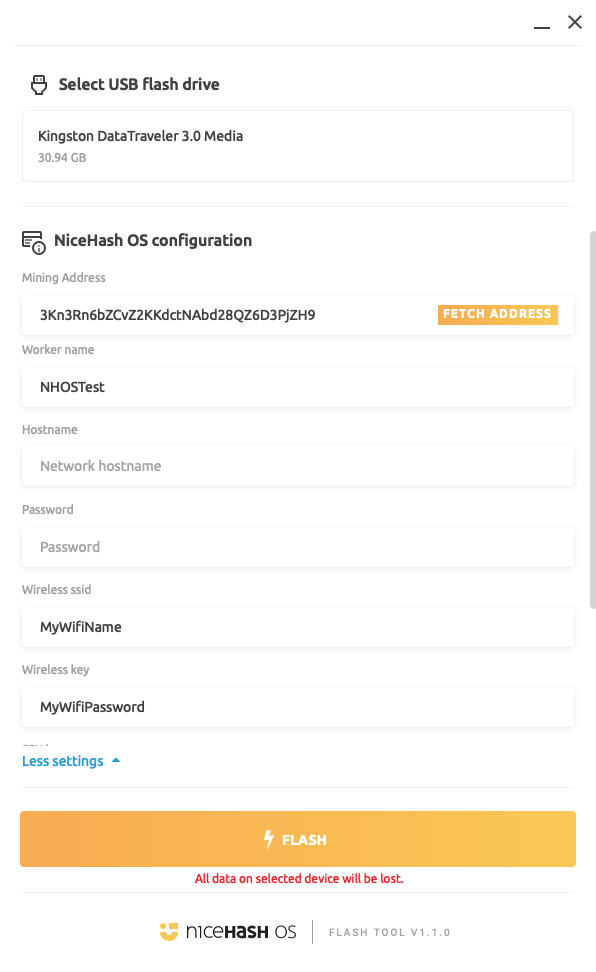
Step 4. (Optional) Configure Additional settings in the Flash Tool
Click on the Additional Settings (optional) button to expand the Flash Tool view. Here you can configure the Worker name, Wifi settings or set up remote access.
- Worker name: this is the optional worker name you can assign to your NHOS rig
Note: the worker name is limited to a maximum of 15 characters and will increment by 1 each time you flash a USB drive. The name can be comprised of English letters and numbers. - Hostname: the remote access host name
Note: the default name used is nhos. - Password: enter the SSH remote access password
Note: the SSH connection only works on a local network. - Wireless ssid: enter your Wifi Network Name
- Wireless key: enter your Wifi Network Password
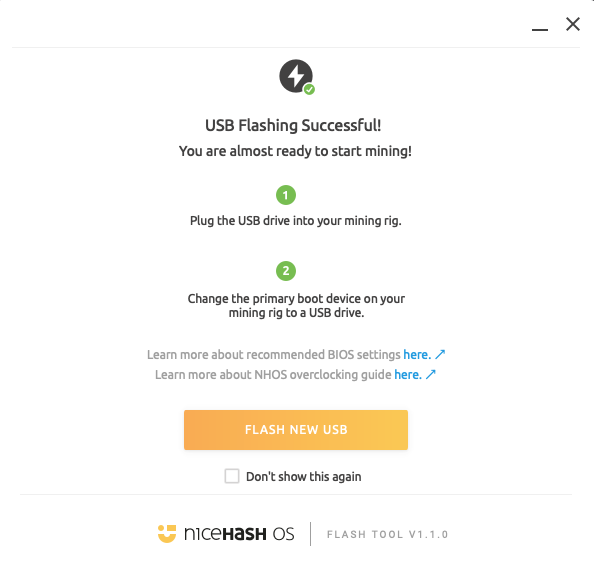
Step 5. Flash NiceHash OS to the USB key
Click on the FLASH button and wait for the flashing process to complete (this can take a few minutes). Once done, you will see the USB Flashing Successful message, after which you can safely remove your newly created NiceHash OS key from your computer.
How to run NHOS?
To start mining simply follow these steps:
- Make sure your rig is turned off
- Plug your NiceHash OS bootable flash drive into any USB port Turn on the system
- NHOS will automatically set everything up for you Log in to your NiceHash account
- Navigate to the Mining section and click Rig Manager. Here you should see your mining rig running NHOS
Troubleshooting
If you encounter any problems with booting up the rig, please make sure your BIOS is set up properly according to our Guide.
- Boot mode: Set boot mode to Legacy (non-UEFI)
- Boot priority: Set a boot priority (order) to the USB port that you want to boot from
- 4G decoding: Enable 4G decoding if your BIOS/motherboard supports it
Advanced Features.
Advanced users can customize the NHOS configuration after it has been created or use 3rd party tools to flash the USB keys.
Using 3rd party tools to flash the NHOS
Some 3rd party flashing tools like Balena Etcher support features like flashing multiple USB keys at once so you can use those if you wish by following the procedure below:
- Download the NiceHashOS image
- Insert your USB key and mount the image in your chosen flash tool
- Flash the NiceHashOS to your USB flash drive and eject once completed
- Plug your USB back in and configure the NiceHashOS via the configuration.json file
Reconfiguring the NiceHash OS USB key
Once the NiceHashOS USB key was successfully used in a rig its file system will change slightly. The configuration.JSON file will be split into two folders named Miner (containing the Mining address, Worker name and Hardware details) and System (containing the network settings). Both folders contain a configuration.JSON file in which you can reconfigure the data you entered during the Flashing process. To do this simply plug your NiceHash OS USB flash drive into your PC, open it and navigate to the desired configuration.JSON file. Open the file with your preferred text editor program, edit the data and then close and SAVE the file. Make sure to write the data in between the "" symbols (write "HERE").
- MINER:
mining_address: enter your Mining address or External address here
Note: this field is mandatory.
worker_name: the optional worker name you can assign to your NHOS rig
Note: the worker name is limited to a maximum of 15 characters and will increment by 1 each time you flash a USB drive. The name can be comprised of English letters and numbers. - SYSTEM:
password: enter the SSH remote access password
Note: the SSH connection only works on a local network. - NETWORK:
hostname: the remote access hostname
Note: the default name used is nhos.
ssid: enter your Wifi Network Name
password: enter your Wifi Network Password
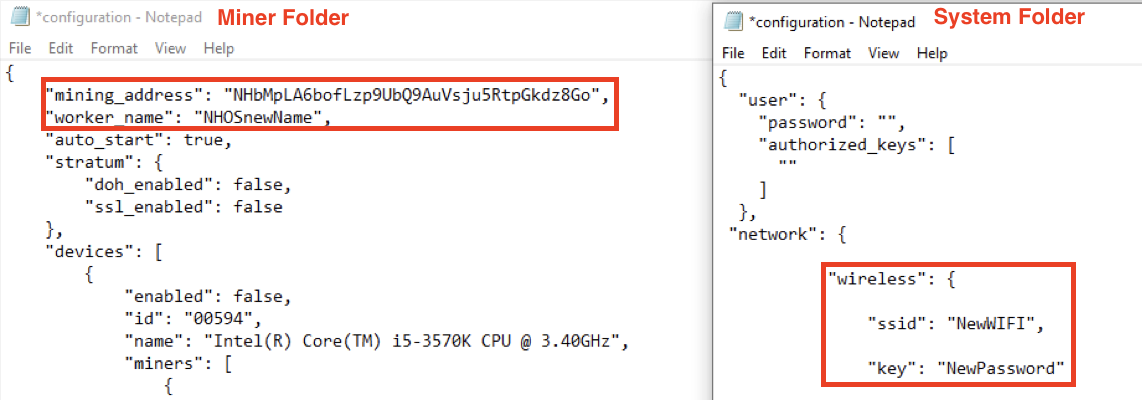 Example of reconfigured configuration.JSON settings.
Optimizing your rig
You can fine-tune and optimise your NiceHashOS rig via Rig manager. Simply follow our guide here.
Bug report
If you believe that you've found a bug that should be reported to NiceHash, then make sure to describe it as precisely as possible. But be sure to also send us a copy of the NiceHash OS system dump file, as this will be of great help to our developers. You can report the bug via this form or open a support ticket.
We will also be present on the NiceHash Discord server - please use the #nhos-v2-alpha-feedback channel to submit your suggestions and report any issues.
You can save log reports to a USB drive by running the following command in the NHOS Terminator (red PC icon found locally on the NHOS rig in the top left corner):
sudo mkdir /nhos-config/system/log
sudo reboot
The first SUDO command will enable persistent logging and create logs on your USB flash drive, the second one will reboot the NHOS. A reboot is necessary before saving the logs to your PC. On Windows/MacOS you will see the logs saved in the system/log folder on the USB drive.
Alternatively (preferred) you can send the logs directly to our servers via NHOS by running this command:
sudo /nhos/sbin/system-dump.sh --push
In the case of pushing the logs to our servers, we need your rig ID or/and your mining address.
Note that persistent logging is recommended to only be used while troubleshooting, otherwise it can shorten the lifespan of the USB key. You can disable persistent logging by running this command:
sudo rm -rf /nhos-config/system/log