NiceHash QuickMiner - Complete Guide
You have just finished the hardware assembly of your mining rig and you have 4, 8, 12 or any number of NVIDIA video cards (GPUs) installed. You wish to start mining reliably as soon as possible with as few as possible problems and doing this the most efficient way. You do not want to lose days tuning your mining rig, you want it done as soon as possible.
Here we are representing all the steps needed after hardware assembly. It should take you less than one hour and your rig will be running optimized and fully reliable mining at NiceHash. We made this guide after having numerous experiences with various hardware, we are covering all the quirks and specialties that need to be considered when establishing software part of the mining rig. This is an alternative to any mining OS solution.
1. Install Windows 10 x64 Home or Pro
The first step is to install Windows 10 (64-bit). It can be the Home or Pro version, it does not matter, but it must be x64 and not x86. Before installation, unplug all but one GPU - troubleshooting and diagnosing issues is much easier and simpler when there is only one GPU. It does not matter what kind of BIOS settings you use at this point, as long as you can boot the installation drive and successfully install Windows 10.
2. Install NVIDIA drivers
This is a very important step for LHR card owners - you should install the 512.77 drivers. These drivers you can find here.
If you are not using LHR cards, install the latest drivers.
After the installation of NVIDIA drivers is complete, you should verify whether the installation was successful. It is best to use GPU-Z for this purpose. You should see the following picture:
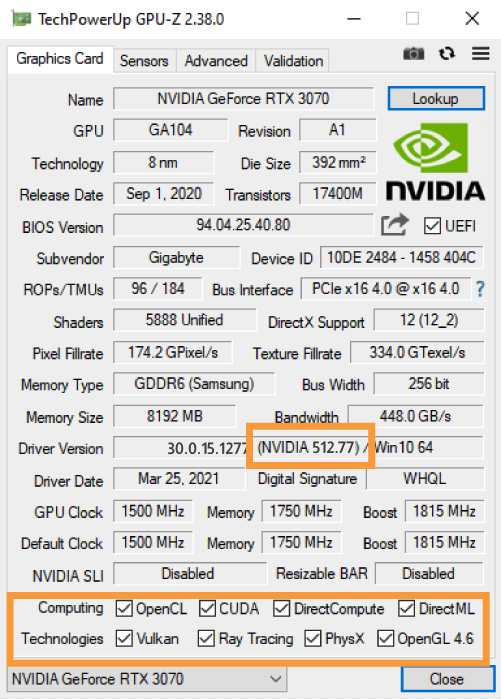
GPU-Z has special features listed for each GPU at the bottom. Usually, when the installation of drivers fails, most of the checkboxes are not checked. When you see (almost) all checkboxes checked, you know that drivers are installed successfully. GPU-Z can also tell you the driver version and whether the driver is DCH or non-DCH.
3. Install NiceHash QuickMiner
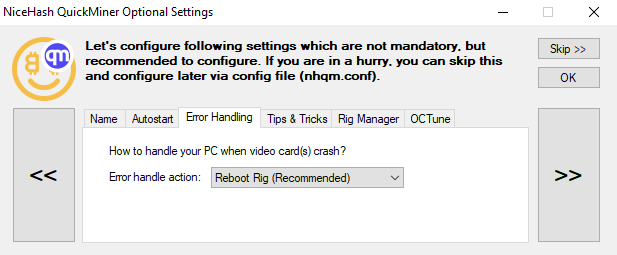
Download the latest release and install it. Windows Defender may give you some issues here. You need to allow NiceHashQuickMiner.exe and excavator.exe. Then:
- configure your mining address to link your rig with your NiceHash account,
- give your rig a name,
- set error handling mechanism to reboot rig,
- do not enable start with Windows at this point yet.
Now, we just want to verify whether the rig is visible in Rig Manager and that we can control it. To test, start/stop it or change OPTIMIZE. If everything is working, then great, we can move onto the next step - reboot your rig into BIOS.
4. BIOS Settings
In BIOS, if you are using more than 3 GPUs and/or at least one is connected using USB-risers, you have to configure the following:
- Set Above 4G decoding to Enabled. Some motherboards also offer a number of bits - set this to 40 or 41. Do not set more than 41, because some devices may have issues then.
- Find settings for the PCIe link. Every slot that uses USB-riser needs to have this configured to either PCIe Gen1 or PCIe Gen2. Higher Gen (Generation, or version) means higher speed. USB risers are not designed with high speeds in mind - rarely can work with Gen3 (forget about Gen4), so we suggest you set it to Gen2. Gen1 could be even better, but some devices can have compatibility issues with Gen1. With our experiences so far, Gen2 is most likely to work fine.
- Set BIOS to UEFI boot only (disable CSM or legacy) - this will give you the least amount of issues with GPU detection.
- Set appropriate primary GPU. If your motherboard/CPU have integrated GPU, we suggest you to enable it and set it as primary GPU, then plug monitor cable (HDMI/DP) into the motherboard. Rendering display reduces hashrate so it is best to use integrated GPU for rendering display if possible.
- Set action when power loss occurs - set to turn on (or last state). In In this case, when power is lost and it comes back, your Rig turns on automatically.
With the above settings, your rig should support up to 13 GPUs without any issues.
5. Reconnect all hardware - GPUs
After you save BIOS settings from the previous step, shut everything down and plug all GPUs back in. Make sure that power is properly distributed, especially if using two or more PSUs.
6. Starting Windows with all GPUs
After Windows is booted with all GPUs connected, you need to give it some time to properly install all newly detected GPUs. This may take quite some time (up to 15-20 minutes, depending on the amount of GPUs). Your screen may flicker several times during this procedure.
Right after booting into Windows, it is recommended to check Device Manager and inspect how many display adapters have been detected (note that some may not have appropriate name yet, because drivers are not installed at this point). The total amount of display adapters should be the amount of GPUs you have (plus integrated GPU, if you use one).
Once installation of drivers is finished, you can use GPU-Z again to verify whether it has been completed successfully. GPU-Z will also show driver version. Here, it may happen, that Windows install old drivers instead of new ones. In that case, run NVIDIA driver installer as you did in step 2 again and keep doing it until you have the latest drivers installed and all devices have all features enabled (checkboxes are checked). Then perform final reboot and once you get back into Windows, GPU-Z should display appropriate driver version with all checkboxes checked for all cards. At this point you know that driver installation was fully successful.
7. Launch QuickMiner and optimize for mining
Start QuickMiner and go to the Rig Manager. Set all devices to use Lite Optimization. Leave it for 10 minutes and observe the Excavator console window. If you do not see Excavator crashing and restarting, and you don't see any hardware errors, set all devices to Medium or Efficient (or any other Optimize profile you prefer). If you notice Excavator crashing or hardware errors appearing, set one less profile (eg, if High set Medium if Medium set Lite) and reboot the Rig.
When you find stable combination of Optimization profiles for all GPUs, enable option to start QuickMiner with Windows.
8. Enjoy perfect mining optimization with full reliability and zero maintenance needed
Your Rig will be fully self-maintained:
- If power is lost, your motherboard's BIOS take care to turn Rig back on. When Windows is started, NiceHash QuickMiner is also started which automatically turns on mining.
- If any of your GPUs crash, freeze, stop working then NiceHash QuickMiner will perform reboot of the rig. After reboot, everything is loaded from zero automatically as in previous example.
- When Windows is updated, after restart, mining continues as before (due to start with Windows feature).
There is only one feature that needs small amount of human-maintenance and that is NiceHash QuickMiner updates (and NVIDIA driver updates), but these are fairly simple (just clicking OK two times). Therefore we suggest you check the display every few days and perform an update if available.
For everything else, monitoring your rig through Rig Manager using the website or your mobile phone is enough. You can see up to the past 7 days statistics of accepted speed, rejects, and profitability and even perform some maintenance (such as rebooting rig remotely). More features will be added in the near future.
Join us at our Subreddit or our Discord server and talk to other users!